Beans, Lego and Monstars

I have been attempting to tidy my sewing room recently and one of the things in a corner was a bag of beans for a bean bag. They were banished to the corner after I found the boys one morning swimming through a sea of white beans in the middle of the lounge floor and laughing “Snow, snow” as they poured them over their heads, under the couch and EVERYWHERE! So I finally made the bean bag they were intended for.
image
It uses some cot panels I got from the sale table at Spotlight and I thought I would give a brief run down on how I made it further down if you are interested. It is not rocket science – it is just a big pillow but I thought it was a cool idea.

Another make for the boys was a new bag/mat for the growing collection of Lego. It has been held in cool Lego head bag that Alex got for his birthday.
image

It is pretty cool but with another birthday coming up I could only see the Lego collection getting bigger so I made a simple circular drawstring mat from a curtain from the op-shop.
image

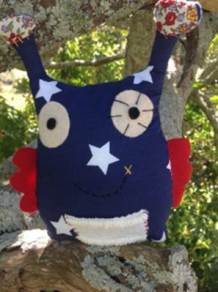
While on the roll with cool things made for kids I thought I would share my friend Vanessa’s cool blog Nowl’s Nest she has just moved over to WordPress and creates awesome softies including this little Monstar which you may recognise the fabric from a certain dress.
image


So if you want to make a Cot Panel Bean Bag…

First take two rectangles (mine happen to be cot panels 110cm x 90cm) and insert a zip about 5cm from the top (or bottom) edge of shortest side of your fabric
image

Next lay your two panels together – one will now be shorter than the other due to the seam created above. Even out the length so they match.

Ensuring your zipper is open slightly, hem all four sides with a standard seam allowance (I used 1.5cm).

Finish all edges to stop fraying – I used overlocking to add another layer of protection from popped stitches and escaped beans.

Turn in the right way and iron to make all the corners and seams crisp.
image

Next mark 1 inch into each corner from both sides (I know I was using metric before and I normally do but the 1 inch line is nice and big on my machine so is easy to line up for this part!) Sew a seam 1 inch in from all sides as a smaller rectangle creating a border around all edges. This is the next barrier of defence from escaping beans.

Finally fill with beans and I cut off the zipper pull with pliers so the boys cannot create a snowstorm again. I can still open the zip with a paperclip in the hole to refill the bean bag or to remove the beans to wash it.

image

My boys are pretty tough with our bean bags – they get jumped into A LOT and so far this one has been up to the test.

Pants please Mummy

How can I say no to that!  Today while sewing a dress Lewis came in to play with the toy sewing machine.  He grabbed some fabric, pins and scissors and asked for some cotton. As he snipped randomly at the fabric he told me he was making pants and a t-shirt.  Next he handed me the slightly shredded piece of fabric and asked me to make him some pants.  As he he is three, cute and quite insistent I put my dress aside and cut out some shorts.

image

As it was not a big piece of fabric I had to be clever to layout the pattern pieces and avoid his earlier random cuts.  I grabbed one of the few kids patterns I own which had a short pattern in it. 
image

image

I asked Lewis if he wanted pockets, he replied “yes, for money and tickets”. So I made up a pocket piece by tracing around his hand and making a rough shape.

image

Got pockets

There was nothing technical in making these pants and when he tried them on,thankfully they fit.  His response…”where’s my t-shirt?” to go with them.  So I best get back to the sewing room.

Christmas is coming…

I have been getting festive…and dangerous with the hot glue gun. I was inspired by pintrest christmas decorations and managed to rummage through the stash to find some fun scraps for my makes.

I started with my key pinterest make which is a set of Retro fabric lights. I found some cute scraps a fabric and made a basic template based on the tutorial at Kojo Designs. For the reels at the top I gave a vague description to Mrs C at Made Marion and she led me to these cute little wooden cotton reels that are a little over 1cm high.
image
I didn’t have any flash red/white bakers twine so I used embroidery thread. I only deviated from the tutorial by sewing the thread into the top of the ‘bulbs’ instead of gluing it to the fabric. I would have taken photos of this but I was too busy burning my thumb on the hot glue gun…also not part of the tutorial.
image
I am stoked with how this turned out and may make another set soon.
image

I also intend to create some felt decorations but I haven’t finished them yet, including some fleece Gingerbread men. Decorations are not complete as I got distracted by making some neck pillows for the boys for Christmas.

image
I basically winged the pattern by measuring the youngest around the neck, creating a U shape and cutting out a bunch! I made the yellow piping using some thin cord and bias tape (again from Made Marion). Everything else was from the stash. The inners are cotton and filled with beanbag beans.
image
I made a couple of extras for my nieces as presents.
image

Also my friend Ness who I have known forever has started a blog of her crafty
creations. So If you want to be inspired by more Christmas decorations check out Nowls Nest

Halloween costumes

This Halloween I made some costumes.

First up was a pair of Ninja Turtle for my boys
image

The front is a double layer of yellow fleece and tne sides are held with safety pins as I was not sure on the final fit since in finished them while they slept.

image

The back was a knit remnant that I drew shell pattern on with a fabric pen and it is stuffed with pillow stuffing. Weapons were made with print outs, cardboard and cellotape. The masks, knee and arm bands were just strips of cotton torn to size.

The boys loved them and went trick or treating to a few neighbouring houses in the rain and have worn them on and off since.

image

Even ninja turtles need some quiet reading time

I have a friend who is nicknamed Oscar who requested a Tigger onesie. I decided it would be more appropriate to make an Oscar the Grouch grown up size. This was a surprise gift so I had to guess size and thankfully I got it right.

I got some green fun fur that looked the right shade on sale from Spotlight. I was a bit scared of sewing the fur, but it was actually quite easy. The hardest part was vacuuming the lounge floor after cutting it out.
image

I made the eye brows from some fluffy yarn that I finger knitted twice then sewed in place. I could not find googly eyes big enough so I went to Made Marion and got the biggest white/cream buttons and some flat black ones. They are not as googly as I would have liked but I think they work well. The hood is lined in knit for added comfort.
image

Here is Oscar in action on me.
image

Of course Oscar is always in his garbage can so I made one of those. I used a grey knit remnant from the fabric warehouse bin sewn into a tube, which I then attached to a hula hoop. Do you know how hard it is to sew around a hula hoop on your sewing machine! The ribbons over the shoulders are tied so it can be adjusted to appropriate can height for the wearer.
image

Finally in other crazy costume onesies, earlier this year my friend and I made 4 animal onesies to wear up skiing/boarding. They all use the same basic pattern as above but are made in fleece with different embellishments depending on the animal.

image

My Owl


image

With wings

image

Bumblebee

image

Kangaroo

image

Penguin

image

Penguin front.

And who could resist these boys.
image

Matchy Matchy Penguins… or the cute and the ridiculous.

A few weeks ago I picked up this cute penguin fabric from the Salvation Army store. It is a polyester with a soft/light texture on the printed side.
image

I bought it to make one of one boys a hoodie… but it is very cute and I do like riduculous clothing, so I thought I could sneak it as a top for myself. So I asked facebook if it was for Lewis or for me… and they replied… FOR LEWIS! So I felt guilty and found my kids sweatshirt pattern – a kwik sew one from the op shop. In laying out the fabric I knew I would have to use a stash black knit for the bands and other parts as I only had just over a metre.
image
I managed to fit the front of my top and the front/back/hood of the hoodie for Lewis. The rest I got out of black stash knit and repurposing an old tee for the armbands asnd waistband of the hoodie.

image

Lewis pile on the left, mine on the right.


I finished the hoodie on Wednesday night but the boy was fast asleep so I tried it on ted and left it there for the morning.
image
I was happy with the result, I think I need to re-do the waistband as it is a little tight, and the hood is a little small as I traced it off an existing top, which if I recall now, is also a little small.
image
I made another Blank Canvas tee for myself which took no time on Saturday morning to whip up. I love the shape of this top. The side seam does not go down the middle of the side, it goes more towards the back.
image
So here we are… matchy matchy… him being cute and me being ridiculous.
image

And just one more cause he is so cute.

image

Cooler weather creations.

It has been a bit quiet on the sewing but I am still playing catch up on posting about what I made earlier in the month. As soon as daylight savings hit Wellington the weather also turned to autumn. Inspired by this I made a couple of scarves that I had been thinking about for a while. I got a few small remnants from Fabric Warehouse recently that are about 50-60cm (the width of the fabric is about 140-150cm). I wanted to make a mobius strip or loop scarf but with 2 different fabrics. This meant I had to get the short seams to join with matching fabrics.

Here pictures make sense:
image
With only one twist the fabrics don’t match.
image
With two twists the fabrics do. This bought me to the question (after I had made two of these) so why twist at all? Ummm… I suppose I didn’t have too but it looks nicer when just hanging loose around your neck (at least I think so).
See…
image

image

image

As I was making these my littlest boy asked for his own scarf so I dug in the stash and made these for the boys.

I also got the knitting needles out and made some wrist warmers from this pattern I found on Ravelry.
image

They were simple as they are knitted flat with the width on the needles running down the arm. I love this and will wear them once it gets cooler and I when can find them as Lewis took them for a walk as part of a superhero costume.
image

I also just finished an amazing bag. Inspired by a stall at the Knack market – I cannot find an online contact to the stall – I made a swandri bag. I got the swanni from the op-shop for $25 and the the handles for $2 and lining for $2 both from Fabric-a-brac on Sunday. I will post my other great buys from there soon.
image

image

And finally… me made may is here. So…
‘I, Sandra of ‘flossie ft’ blog sign up as a participant of Me-Made-May ’13. I endeavour to wear at least one item of clothing each day for the duration of May 2013.’

Also I am taking part in the WSBN burda sew along. I have a Burda dress traced out as well as a few other items in my plan so watch this space.